Hey hey hey, my fellow foodies! 👋 It’s your one-trick solution blogger, Haofazi! Today, I absolutely have to share a treasured family secret with you – our Secret Recipe Tea Eggs! 🥚✨
Let’s be real, haven’t you ever felt that store-bought or casually home-boiled tea eggs are just… lacking something? Either they’re bland inside, the yolk is dry and chalky, the color is pale, or they have a weird, overpowering spice taste? 🤦♀️ As a blogger with extremely high standards for food (okay, maybe I’m just greedy 😋), I simply cannot stand mediocre tea eggs!
Growing up, the thing I looked forward to most was my grandma’s pot of tea eggs. The aroma would fill the entire courtyard! I’d always hover around the stove, drooling 🤤. After much coaxing and puppy-dog eyes, I finally managed to “trick” her into sharing the recipe she’d used for decades! After countless trials and improvements (mostly because I wanted to eat them myself 😋), today I’m sharing this 100% foolproof, lick-your-fingers-clean, makes-you-want-to-chew-the-shell ultimate secret recipe with you, absolutely no reservations! I guarantee your kitchen will soon be filled with that irresistible tea egg fragrance, blowing away anything you can buy outside!
Secret #1: The Soulful Egg Selection & Golden Pre-Boil ✨
- Egg Selection is Fundamental: Use room temperature eggs! Room temp! Room temp! Important things are said thrice! Ice-cold eggs straight from the fridge are prone to cracking due to thermal shock when put in hot water, turning into “egg drop soup”! Take them out half an hour beforehand to warm up, or soak them in lukewarm water for a bit. Try to pick eggs of similar, medium size for the best texture. Freshness is also key; fresher eggs have firmer yolks and springier whites.
- Gentle Cold Water Start: Carefully place the eggs in a pot. Add cold water until the eggs are fully submerged. Cover with a lid and cook over medium heat. Remember! Start with cold water so the eggs and water heat up gradually and evenly, preventing sudden cracks.
- Golden Boiling Time: Once the water boils, start timing. Cook for 8-10 minutes. If you prefer a slightly softer yolk, go for 8 minutes. If you like it fully cooked and firm, aim for 10 minutes. I personally prefer 10 minutes, ensuring the yolk is cooked through, which helps it hold shape and absorb flavor better during soaking. Don’t overcook, or the yolk edges will turn greenish-grey and the texture will become rubbery.
- Rapid Cooling for Perfection: As soon as the eggs are done, immediately remove them and plunge them quickly! Instantly! into an ice bath! Or rinse them under cold running water until cool. This step is crucial! It creates a thin layer of water between the shell and the white, making peeling super easy (a blessing for perfectionists!), and instantly stops the cooking process, maintaining the tender texture of the egg white and preventing residual heat from overcooking the egg.
Secret #2: Heavenly Spices & Exclusive Tea Base 🌿
This is the heart and soul of the tea egg! Say goodbye to blandness from just soy sauce and tea. Follow my lead!
Sichuan Peppercorns: 1 small pinch (around 20-30 peppercorns). The slight numbing sensation elevates the flavor profile, adding dimension. If you dislike the numbing effect, use less or omit, but I highly recommend trying it!
Essential Spices (Indispensable):
Star Anise: 2-3 pods. Provides the classic, rich, complex aroma – the signature scent of tea eggs.
Cinnamon Stick: 1 small piece (about finger-length). Adds a warm, sweet fragrance and depth.
Bay Leaves: 3-5 leaves. Contribute a unique, fresh aroma that cuts through richness.
- Fennel Seeds: 1 small teaspoon. Adds a hint of licorice-like sweetness.
- (Optional – Advanced Level) Cao Guo (Tsaoko Cardamom): 1 pod, cracked open. Adds a smoky, intense aroma.
- (Optional – Advanced Level) Cloves: 2-3 buds. Potent aroma, a little goes a long way for enhancing fragrance.
- Key Point: Briefly rinse the spices under water before using to remove dust. Don’t go overboard with the quantity; balance is key!
- The Soulful Tea Base:
- Top Choice: Black Tea! Pu-erh, Keemun, Lapsang Souchong – all work well. Black tea provides a deep color, making the eggs look appetizing, and its robust flavor pairs perfectly with spices and soy sauce. I often use Lipton black tea bags for convenience and consistency, about 4-5 bags (for 10-15 eggs). Or use 20-30g of loose-leaf black tea.
- Second Choice: Oolong tea can also work; the aroma will be lighter and more floral, and the color slightly paler.
- Not Recommended: Green tea. It yields a light color and a more delicate, slightly bitter taste that gets easily overwhelmed by the soy sauce and spices, resulting in a less satisfying outcome.
- Golden Seasoning:
- Light Soy Sauce: Provides saltiness and umami. About 1/2 cup (approx. 120ml).
- Dark Soy Sauce: Primarily for color! Gives the tea eggs that beautiful, inviting reddish-brown hue. About 1/4 cup (approx. 60ml).
- Rock Sugar: The soul! Balances the saltiness, adds layers of flavor, makes the taste smoother and rounder, and gives the eggshells a lovely sheen. About 30-50g, adjust to your sweetness preference. Granulated sugar works too, but rock sugar yields a better result.
- Salt: For supplementary seasoning. Since light soy sauce is already salty, add just a small teaspoon (about 5g), or taste the brine first before deciding.
- (Optional Flavor Boost) Oyster Sauce: One tablespoon for added complex umami.
- (Optional Flavor Boost) Cooking Wine / Huadiao Wine: One tablespoon to remove any potential eggy smell and enhance aroma.
Secret #3: The Gorgeous “Ice Crackle” & The Art of Patient Infusion ⏳
Pay attention! These two steps are the essence of making tea eggs that are flavorful and beautiful!
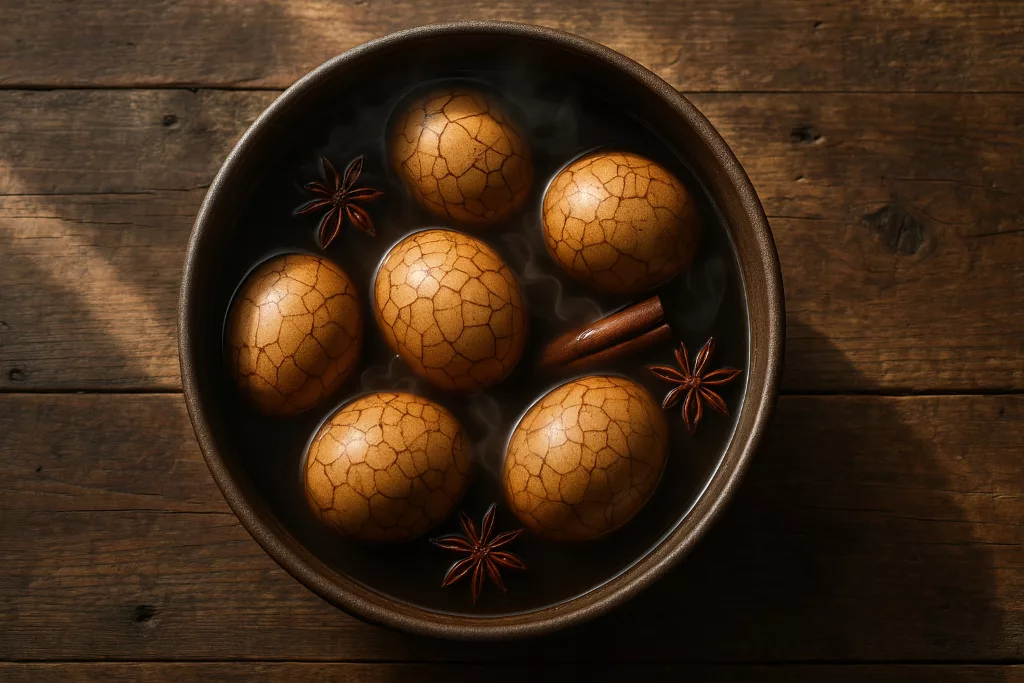
- Creating Artistic “Ice Crackles”: Take the cooled, hard-boiled eggs. Use the back of a spoon (or gently tap them on the counter) to create even cracks all over the shell. Note! You want fine, intricate cracks, like on Ge Yao porcelain, not shattered shells! The finer and more evenly distributed the cracks, the better the brine will penetrate, and the prettier the pattern will be. Don’t use too much force and knock off chunks of the shell or create large holes; this allows the brine to rush in unevenly, making some parts too salty and ruining the aesthetic. Treat each egg gently!
- Braising Liquid: Golden Ratio & Pre-Brew:
- In a pot, add enough water to generously cover all the eggs later. Add all the spices, tea bags/leaves, light soy sauce, dark soy sauce, rock sugar, salt (and any other optional seasonings).
- Bring to a boil over high heat, then turn down to low heat, cover the pot, and let it simmer for 20-30 minutes. This allows the flavors of the spices and tea to fully infuse into the liquid. This step is key to creating a rich, flavorful base brine! Brew the brine before adding the eggs!
- Patient Simmering: Gently lower the cracked eggs into the fragrant brine, ensuring they are fully submerged. Bring the liquid back to a boil, then immediately turn the heat down to the lowest setting (just maintaining a gentle simmer). Cover and let the eggs simmer for 40 minutes to 1 hour. You can gently stir the eggs occasionally to ensure even coloring and flavor absorption.
- The Ultimate Secret – Soaking! Soaking! Soaking! This is what truly separates ordinary tea eggs from extraordinary ones! After simmering, do not remove the eggs! Turn off the heat and let the eggs cool down completely in the brine. Then, transfer the eggs along with the brine into a large bowl or airtight container. Cover it tightly (with a lid or plastic wrap) and place it in the refrigerator to soak overnight! Aim for at least 6-8 hours of soaking time, minimum!
- Highlight: The soaking process is the core step for allowing the flavors to slowly and thoroughly penetrate deep into the egg! Long, low-temperature soaking infuses the yolk beautifully without overcooking the white and making it tough, which can happen with prolonged heating. For those of you wondering why your homemade tea eggs only taste flavorful on the outside while the inside remains bland – this is likely the missing step!
Secret #4: Enjoying & Storing + FAQ (Pitfall Guide) 🧐
- How to Enjoy Perfectly: Take the tea eggs out of the fridge. You can eat them cold (super refreshing in summer!) or gently reheat them in some of the brine before eating. Peel off the shell to reveal the stunning “ice crackle” pattern and inhale the rich aroma. The white is tender and springy, the yolk moist, flavorful, and slightly sandy… Ah, I can’t talk anymore, I’m drooling! 🤤
- Storage: Keep leftover tea eggs submerged in the brine and refrigerated. They will last for 3-5 days. The flavor continues to develop as they soak, making them even tastier. If the brine becomes too thick or salty over time, you can dilute it with a little water.
- Reusing the Brine: The brine from the first batch is liquid gold! Strain out the used spices and tea leaves. You can freeze this “master stock” for future use. Next time you make tea eggs, use this as a base, adding fresh spices, tea, and seasonings as needed. The flavor will become progressively richer and more complex over time! That’s the magic of a “master stock”!
- Common Problems & Solutions (Troubleshooting):
- Q: My eggs keep cracking while boiling? A: Did you use cold eggs? Did you start with cold water? Was the heat too high? Ensure these points are covered and handle the eggs gently.
- Q: I can’t get the cracking right; it’s either not cracked enough or the shell falls off? A: Use the back of a spoon to tap gently and evenly. Practice makes perfect! Aim for fine, widespread cracks, not large chunks missing.
- Q: The flavor isn’t strong enough? A: Did you use enough spices and tea? Did you simmer the brine long enough initially? Most importantly, did you soak them long enough? Overnight soaking is the key!
- Q: The color isn’t dark enough? A: Did you use black tea? Was there enough dark soy sauce? Was the soaking time sufficient?
- Q: They taste too salty? A: Reduce the amount of light soy sauce and salt next time, or increase the rock sugar. If they’re already too salty, you can rinse the shelled egg quickly under water before eating, or add more water to the brine when reusing it.
- Q: The egg white texture is rubbery/tough? A: Did you boil the eggs for too long initially? Was the simmering heat too high? Remember to use the lowest heat for simmering and rely primarily on soaking for flavor infusion, not prolonged high-temperature cooking.
My Experience & Review:
Honestly, ever since I mastered my grandma’s method, my tea eggs have been foolproof! Every time I make a big batch, not only do I enjoy them immensely myself, but they also earn rave reviews and gasps of delight when shared with friends and colleagues 🌈! The rich aroma that permeates the egg inside and out, combined with the tender white and the perfectly infused, slightly crumbly yolk – it’s a world away from any store-bought version! And that perfectly imperfect “ice crackle” pattern? It’s like unwrapping a surprise every time you peel an egg! It’s a feast for both the eyes and the palate! I wholeheartedly encourage all you lovely people to give it a try. It’s not difficult, just requires a bit of patience, but the result is absolutely worth it! 💖
Alright, that’s all for today’s ultimate guide to 【Secret Recipe Tea Eggs】! I hope all you darlings can make tea eggs that absolutely wow yourselves, your family, and friends! Quick, save this post 🌟, give it a thumbs-up 👍, and share it with your foodie buddies! If you have any questions or your own secret tips, feel free to drop them in the comments below! 👇